
Drywall Tape & Bed Dallas, TX
Before you begin taping, prepare the inside corner bead by shaving off any wood around the inside corner. This preparation will make it easier when placing the drywall tape.
When measuring for the taping, it is important to follow the size of the drywall anchor and studs you will need. It is better to have more drywall anchors and studs than you need. This will ensure that the tape will remain in place and you won't cut into your drywall while taping.
Start by taping the inside corners and joint compound if necessary. Be sure to overlap the tape so the drywall will be covered. Tape the corners evenly. To hide the joint compound, you can internal drywall paper between the tape and the drywall anchors and studs. This can be done when the tape is wet or dry.
Professional Installation.
If your drywall knife isn't long enough to cover the entire area you need to repair, then you may need a tape roller or a utility knife. With the tape rolled tight against the wood, run the drywall knife along the tape, covering small gaps. Make sure the tape is tight but not too tight. This can cause the repair to crack.
To repair the seams where the two pieces of tape meet, pull the tape through the drywall joint compound and over the drywall edge. Pull it tight enough that the repair is tight enough. Use a drywall knife to pry the two pieces of tape from the drywall surface. This process, known as tape and bedding repair, involves ensuring that there is no overlap drywall tape which could compromise the smooth finish of your walls. It's crucial in the tape and bed walls process to avoid such overlaps to achieve a seamless repair.
You will probably need a tool like a drywall knife, an electric drill, or an adjustable wrench for this step. If the damage is extensive, you may want to replace the drywall panels. Never slide drywall near me back into place before repairing the sheetrock. When considering tapes and adhesives Dallas Texas, it's essential to choose the right products for tape and bed repairs, ensuring they are suitable for the job and will cover drywall seams with wood effectively if that's the chosen method of repair.
Drywall Finishing.
Before repairing bed seams or taping the drywall panels, you may also want to apply a clear tape protecting the bed from moisture. This is a part of taping beds, where the goal is to shield the surface from potential water damage, an important consideration in areas like Dallas, Texas, where humidity can affect drywall.
The tape can be secured at the bottom of the drywall or taped to the top for a finished look. It will protect the wood from moisture damage. It also makes it easier to see the damage if it occurs in the middle of the night. Drywall caulk can also be applied around the edges and the drywall joints for extra protection, a technique often included in tape bed and texture services.
Sheetrock.
To begin repairing the corners of drywall, remove the damaged corner bead as well as any screws securing the drywall tape to the frame. Start by removing the damaged corner bead. Your drywall tape will have measurements for its connection points, so be sure to follow these directions. Apply the corner bead screw fixing the tape to the drywall with the drywall knife and then work your way around the frame until all the way around. Replace the drywall bead if it was removed. This process, critical for those learning how to tape and bed corners, ensures a durable repair, especially when tape ceiling drywall tasks are required.
Using a glue gun or a utility knife, firmly press the corners of the repaired area to make sure it is completely secure. Work slowly and gently to avoid damaging the drywall surface. Once you are happy with the repair, carefully remove the paper tape and put aside. This step, although seemingly minor, addresses the question is tape necessary for drywall by affirming that taping is necessary for drywall, ensuring stability and longevity of the repair.
Understanding Drywall Tape & Bed:
Drywall Tape and Bed is a critical aspect of achieving flawless walls and ceilings in your construction or renovation projects.
Understanding Tape and Bed
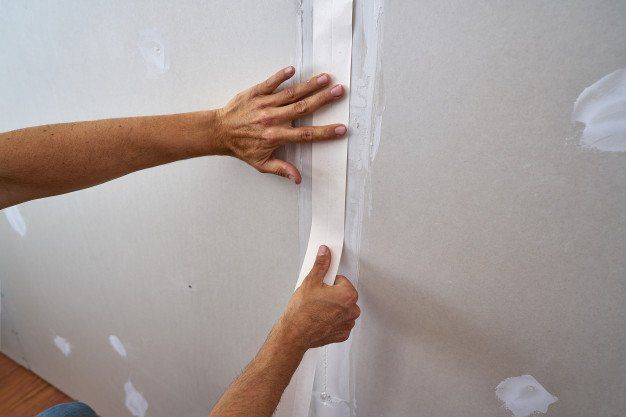
Tape and bed refers to the process of applying tape and joint compound to the seams between sheets of drywall. This technique ensures a smooth, seamless finish, preparing the surface for painting or texturing.
Types of Tape and Their Applications
- Paper Tape: A traditional product that requires an adhesive in the form of joint compound to adhere to the drywall. Ideal for corners and seams.
- Mesh Tape: Self-adhesive and perfect for quick fixes, though it often needs a thicker layer of joint compound.
- Blue Tape: Often referred to as painter's tape, it's used for protecting surfaces during painting. Its easy removal without residue makes it a favorite among professionals.
- Kapton Tape: Known for its high-temperature resistance, Kapton tape is less common in drywall projects but useful in specialized applications.
- Masking Tape: While similar to blue tape, it's typically less adhesive and more suitable for temporary holds or marking.
The Process: Tape and Bed Steps
- Preparation: Ensure your wall surface is clean and dry. Choose the right type of tape for your specific needs.
- Application: Apply the tape along the drywall seams. If using paper tape, apply a thin layer of joint compound first.
- Bedding the Tape: Press the tape into the compound using a drywall knife. Remove excess compound and ensure no air bubbles.
- Finishing: Apply additional layers of joint compound, feathering out the edges to blend with the wall.
Product Recommendations and User Comments
- Deck Hardware: Though not directly related to tape and bed, selecting high-quality deck hardware is essential for a sturdy and long-lasting build.
- Print Bed/Build Plate: For 3D printing enthusiasts, using tapes like Kapton or blue tape on your print bed can improve adhesion and result quality.
Choosing the Right Tape: Factors to Consider
- Adhesive Strength: Depending on your project, the strength of the adhesive is crucial. Blue tape offers a delicate balance suitable for painting.
- Flexibility: Paper tape is excellent for corners due to its flexibility.
- Ease of Use: Mesh tape's self-adhesive nature makes it user-friendly, especially for DIY enthusiasts.
Reports, Reviews, and Author Comments
- Reports: Regular updates on product advancements and user experiences are essential for staying informed.
- Reviews: User reviews offer real-life insights into the effectiveness of different tapes and techniques.
- Author Advice: From professional tips to DIY tricks, author comments can provide valuable guidance.
Conclusion
Tape and bed are crucial steps in ensuring a professional finish in your drywall projects. Whether you're a seasoned contractor or a DIY enthusiast, selecting the right tape and mastering the bedding process can significantly impact the outcome of your work. Always stay updated with the latest products and techniques, and don't hesitate to share your experiences and insights with others in the community.
For professional guidance, tips, and product recommendations, feel free to explore
our blogs. If you need expert assistance with drywall installation, repairs, or taping, don’t hesitate to
contact us for a free quote today!
